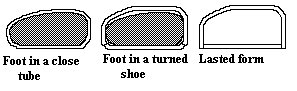
So, can you take a pattern like this and work with it? Certainly. Instead of shaping around the whole foot, take a tracing of the foot along the outside edge. When you make the fabric and tape pattern, extend the material along the sides of the foot all the way to the ground.
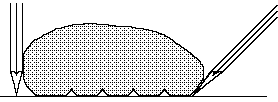
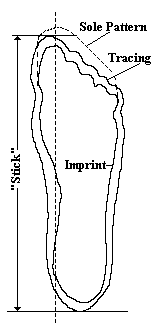 First, trace the foot, either with
the pencil perpendicular to the paper you are drawing on, or, if you are feeling
adventurous, running along the imprint line of the foot. You could also use a
pedograph print to do this, or even get a footprint of ink or paint.
First, trace the foot, either with
the pencil perpendicular to the paper you are drawing on, or, if you are feeling
adventurous, running along the imprint line of the foot. You could also use a
pedograph print to do this, or even get a footprint of ink or paint.
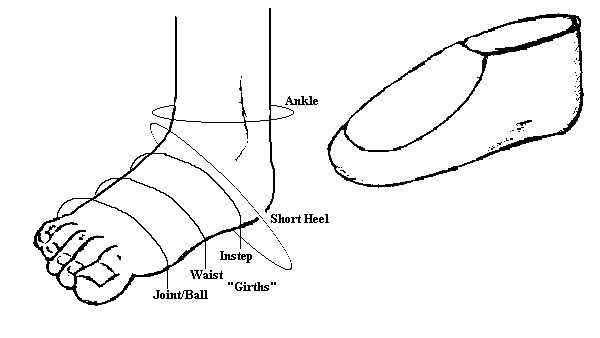
- The areas to be measured are traditionally referred to as Girths, and there is some
dispute among the professionals as to what exactly the measurements are are
"supposed" to be. Really, as long as you are consistantly measuring the
foot and transferring those measurements to your patterns, it's not terribly relevant if
you don't use exactly the same system as someone else, or don't call things by exactly the
same names. Therefore, the girths most often taken are at the Joint or Ball of the
foot (i.e., the widest part), the Waist (which is about an inch behind the Joint), which
is sometimes referred to as the Low Instep (although some people place the Low Instep an
inch behind the Waist), the Instep or High Instep is the highest point of the instep,
where the bump of the middle cuneiform protrudes. There is also a girth measurement
called a Hass, which is behind the High Instep, and is the highest point of the foot,
where it merges with the shin, but this is not universally used (and isn't important for
measuring for below the ankle shoes). These may be measured around the foot, or from
the "ground" where you drew your tracing (i.e., straight down the side, or
reaching under to the imprint line). Finally, measure around the ankle, and take the
short heel measurements.
These measurements should not be taken while the weight is on the foot.
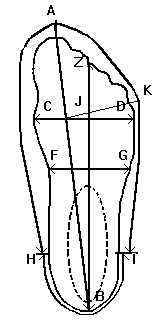
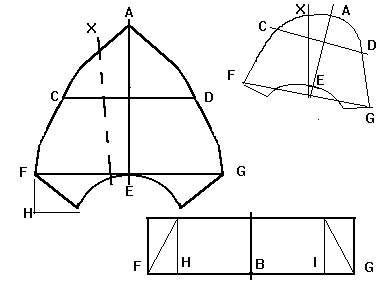
There are several other measurements you can take at this point such as taking the Stick (or length) of the footprint. Measure the length of the vamp (or top of the foot from the toe to the top of the ankle), marked AE. The outer circumference of the fore foot imprint from the ankle-point to ankle point, Marked HI, being certain to note the location and distances HB and IB. as well as the outer circumference of the foot print from the ankle-point to ankle point, Marked FG, being certain to note the location and distances FB and GB. At this point, you will want to mark the "point" of the toe, (marked A on the figure) and the true centerline of the foot (Marked ZB on figure). - Turn to the shoe design to be copied, and look for any special instructions, or look for special problems that might arise. Carefully lay out the pattern on paper and recheck your measurements. Now draw out the pattern, based on those measurements. If you want to enlarge the archaeological designs to give you a rough idea of what the pattern might look like, go ahead, but for goodness sake do not just use those for your pattern. In fact, let me stress this again, CAUTION! Do Not just enlarge the designs to use for a pattern. The designs in this work and such as those found in archaeologial sites are not patterns, but rather guides to help you make the patterns. The leather may have stretched and twisted in ways you aren't expecting, and I may have fiddled with the picture in order to make the design easier to understand. If you use them as direct patterns and cripple yourself, I won't have any sympathy for you.
- As you are drafting out the design, you are going to need to add in some extra room in the toes and the heel. I can't really give you a definate amount, since I've heard anything from 1/2" in the front to 2/3" (round toed shoes)-1 1/3" (the last is for narrow toed boots); and 1/4"-3/4" in the heel. I'd start with the 2/3" in the front and 1/4" in the back, and work from that. Note that this in front of ALL the toes, and any extra for poulaines will extend beyond that.
- If you are using heavy leather, add 1/8"-1/4" to ALL dimensions, to give a little more flex room.
- Sizes increase by the half inch (I don't know why since in lengths are measured in thirds of an inch). This means that a pattern for a size eight shoe will be about a half inch bigger all around than that of a size seven. Note that this rule of thumb is unreliable beyond two or three sizes.
- Cut out the pattern. At this point, it would be a Good Idea to cut out a fitter's model of cheap leather (or non-stretching fabric, or even muslin and duct tape), a prototype or mockup, based on your pattern. This will give you the opportunity to adjust your pattern without needlessly ruining leather. [I've screwed this part up myself]
Now, having just gone through all of that, there are several short cuts available, most of which are discussed in "Easy Ways Out".
Footwear of the Middle Ages - The Pattern, by I. Marc Carlson. Copyright 1996,
1999
This page is given for the free exchange of information, provided the author's name is
included in all future revisions, and no money change hands, other than as expressed in
the Copyright Page.